DIY Method for Safe Solar Panel Removal
Are you considering removing your solar panel system, but unsure of where to start? Don’t worry, we’ve got you covered! With the right knowledge and careful execution, you can safely uninstall your solar panels without causing damage or incurring additional expenses.
In this comprehensive guide, we will provide you with step-by-step instructions and valuable tips to ensure a smooth and hassle-free removal process. We’ll cover everything from handling the electrical components and disconnecting the system safely to precautions for avoiding water damage and minimizing any potential risks.
By following our expert advice, you’ll not only save money on professional assistance but also gain the confidence to tackle this project on your own. So keep reading and learn the DIY method for safely removing your solar panel system.
Why Choose DIY Method for Solar Panel Removal?
When it comes to removing your solar panel system, opting for the DIY method can have several advantages over hiring professionals. Here are some reasons why you might consider taking on the task yourself:
1. Cost Savings: Hiring professionals for solar panel removal can be expensive. By choosing the DIY method, you can save a significant amount of money that would otherwise be spent on labor fees.
2. Flexibility and Convenience: When you remove the panels yourself, you have the freedom to work at your own pace and according to your schedule. You can also avoid the hassle of coordinating with external contractors.
3. Learning Experience: DIY solar panel removal provides an opportunity to gain hands-on knowledge about your system. This knowledge can be valuable when it comes to troubleshooting or future maintenance.
4. Increased Control: When you take on the removal process, you have complete control over the entire operation. You can ensure that the panels are handled with care and that no damage occurs during the removal.
However, it’s important to note that solar panel removal can be a complex task, and it requires careful planning and adherence to safety guidelines. Make sure to equip yourself with the necessary knowledge and tools before attempting the removal process.
Also read: How to Use Solar Panels During Power Outage
Method to Remove the Solar Panel Safely
Removing solar panels from your property requires careful execution to ensure a safe and efficient process. Follow these step-by-step instructions and precautions to ensure that you can safely uninstall your solar panel system without causing any damage or incurring additional expenses.
Shutting Down the Power
Before you begin removing the solar panels, it is crucial to disconnect the power source. This step is essential for your safety and to avoid any electrical accidents during the removal process. Follow these steps:
1. Turn off the circuit breaker that supplies power to the solar panel system.
2. Use a voltage tester to verify that there is no current flow in the system.
3. If your solar panel system has a rapid shutdown button, press it to deactivate the live connection between the panels and the electrical grid.
Unplugging Solar Panels from One Another
Next, you will need to disconnect the solar panels from each other. Follow these guidelines:
1. Identify the electrical cabling and AC power connections between the panels.
2. Carefully unplug the connectors, ensuring that you do not damage the electrical wiring.
3. Take note of the connections you separate to ensure proper reassembly later.
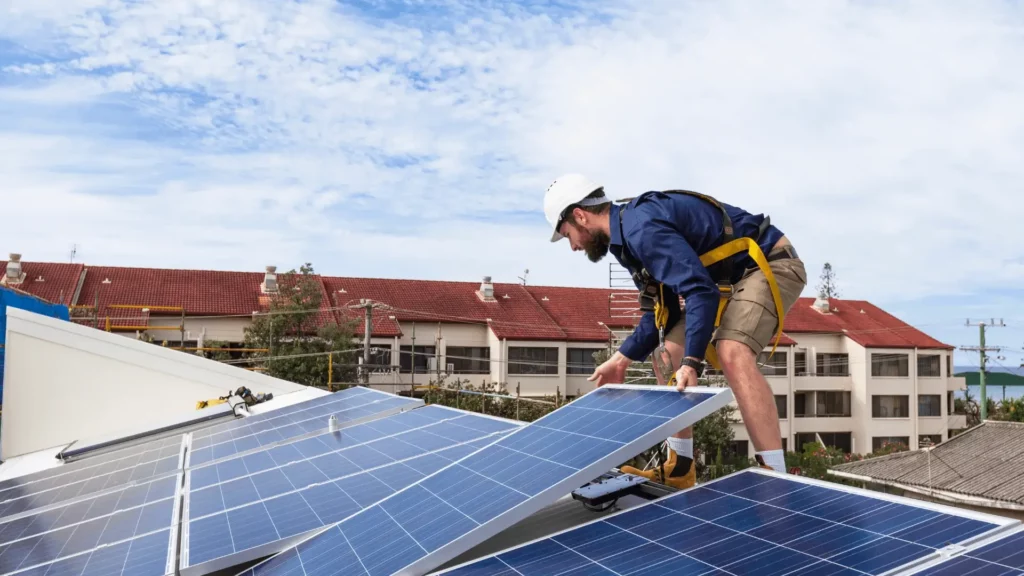
Removing Solar Panels
With the power shut off and the panels disconnected from each other, you can now begin removing the solar panels from their mounting system. Follow these steps:
1. Start with the topmost panel in your array and work your way down.
2. Loosen the mounting hardware, such as brackets or clips, that secure the panels to the roof.
3. Gently lift each panel and slide it out of the mounting system.
4. Place the panels on a secure surface to avoid any potential damage.
Separate Hardware
Once the panels are removed, you can proceed to remove any additional hardware that supported the panels’ installation. Follow these steps:
1. Carefully remove any clips, brackets, or other hardware that secured the panels to the mounting system.
2. Keep track of the hardware you remove to ensure reassembly if needed.
Unfastening Cables/Wires
After removing the panels and any additional hardware, you will need to disconnect and remove the cables and wires connected to the solar panels. Follow these instructions:
1. Identify the electrical cabling and connections on the back of the panel.
2. Use appropriate tools, such as wire cutters, to cut the electrical connections.
3. Safely remove the cables and wires from the panels.
Removing the Grounding System
The grounding system is an essential safety feature of your solar panel installation. When removing the panels, you must also remove the grounding system. Follow these steps:
1. Locate the grounding rod connected to the system.
2. Disconnect any grounding wires or cables.
3. Carefully remove the grounding rod from the ground, ensuring proper electrical safety protocols.
Settle the Components
Once you have successfully removed the solar panels and related components, it is crucial to store and transport them safely. Follow these recommendations:
1. Clean and inspect each panel before storage.
2. Use protective coverings or packaging to prevent any potential damage during transportation or storage.
3. Store the panels in a secure and dry area away from any potential sources of damage or unnecessary exposure to the elements.
This method provides an overview of the safe and proper way to remove a solar panel system. By following these steps and taking necessary precautions, you can ensure a smooth uninstallation process without jeopardizing your safety or the integrity of the panels. Remember, if you have any doubts or concerns, it is always advisable to seek professional assistance to avoid any mishaps.
Also read: How Hot do Solar Panels Get
Shutting Down the Power
Before you begin the process of removing your solar panels, it is crucial to ensure the power source is completely shut down. This step is essential to prevent any electrical hazards and ensure your safety throughout the removal process. Follow these step-by-step instructions to safely disconnect the power:
1. Turn off the circuit breaker: Locate the circuit breaker dedicated to your solar panel system. Switch it off to cut off the power supply from the panels to your home’s electrical system.
2. Confirm the power is off: Use a voltage tester to check if there is still any electrical current flowing from the panels. This will help you ensure that the power is successfully shut down.
3. Turn off the inverters: If your solar panel system has multiple inverters, make sure to turn them off as well. This will help prevent any accidental electrical shocks during the removal process.
By following these instructions and shutting down the power properly, you can minimize the risk of electrical accidents and safely proceed with the solar panel removal.
Also read: Can You Put Solar Panels On A Metal Roof?
Unplugging Solar Panels from One Another
To safely remove a solar panel system, it’s essential to know how to disconnect the solar panels from each other. Follow these steps to ensure a smooth and proper process:
1. Turn off the power: Before starting any disconnection, shut down the solar panel system’s power source. This step is crucial to prevent any mishaps during the removal process.
2. Identify the connectors: Solar panels are interconnected through specific connectors, such as MC4 or Amphenol connectors. These connectors are designed to ensure a secure and reliable connection between panels.
3. Disconnect the connectors: To unplug solar panels from each other, you need to separate the connectors. Most connectors can be disconnected by pushing down on the locking tabs and gently pulling them apart.
4. Proper handling: When disconnecting the connectors, make sure to hold the connectors themselves rather than tugging on the wires. This prevents any strain or damage to the electrical components.
5. Label the connections: It’s recommended to label the connectors and wires as you disconnect them. This practice will simplify the reinstallation process if you plan to reuse the panels in the future.
Remember, if you’re unsure about any step or encounter any difficulties, it’s always a good idea to seek guidance from a professional or consult the manufacturer’s instructions.
Also read: How Long Does It Take To Install Solar Panels: A Comprehensive 2023 Guide
Removing Solar Panels
Properly removing solar panels from their mounting system is crucial to ensure a safe and damage-free process. Follow these detailed steps to minimize the risk of any harm:
1. Start by shutting down the power: Before touching any component, it’s essential to disconnect the power source. Locate the circuit breaker dedicated to the solar panels and turn it off, ensuring that there is no electrical current flowing through the system.
2. Unplug the solar panels from one another: Carefully disconnect the cables running between the solar panels, ensuring that there is no tension or strain on the connections. Use caution to avoid any damage to the wiring.
3. Remove the solar panels: Begin by releasing any clips or brackets securing the solar panels to their mounting system. Take each panel one at a time, ensuring a firm grip and carefully lifting them away from the roof or structure.
4. Separate any additional hardware: Once the panels are removed, detach any remaining hardware, such as brackets or clips, from the mounting system. Keep these components organized and safely stored for future use or disposal.
5. Unfasten cables and wires: Disconnect the electrical cables and wires connected to the solar panels, ensuring that all connections are properly unscrewed or unlocked. Take care not to damage any of the wiring during this process.
Remember, if you have limited experience or are unsure about any step of the solar panel removal process, it’s always recommended to seek professional assistance. Safety should be the top priority to avoid potential accidents or damage.
Also read: How Often Should Solar Panels Be Cleaned?
Separate Hardware
To safely remove solar panels, it is important to not only focus on the panels themselves but also on any additional hardware that may be holding them in place. This includes brackets, clips, and other components used for mounting. Removing this hardware correctly ensures a smooth and damage-free removal process.
Here are the steps to properly separate and remove the hardware:
1. Begin by carefully inspecting the mounting system and identifying the hardware that needs to be removed.
2. Use the appropriate tools, such as a screwdriver or wrench, to gradually unfasten the bolts or screws securing the hardware.
3. As you remove each piece of hardware, be mindful of any electrical connections or cables that may be attached.
4. Keep the hardware organized and labeled to make reinstallation (if needed) easier in the future.
By following these steps, you can safely and efficiently remove the additional hardware holding your solar panels in place, ensuring a successful uninstallation process.
Also read: How to Repair Solar Panel Rust: A Step-by-Step Guide
Unfastening Cables/Wires
To safely remove the solar panels, it’s crucial to disconnect and remove the cables and wires that are connected to them. Follow these steps to unfasten the cables and wires:
1. Turn off the circuit breaker: Before starting the process, ensure the circuit breaker that supplies power to the solar panels is turned off. This step is essential to prevent any electrical accidents during the removal process.
2. Locate the connectors: Identify the connectors where the cables or wires are attached to the solar panels. These connectors may vary depending on the specific installation, so refer to the manufacturer’s instructions or consult with a professional if needed.
3. Disconnect the connectors: Carefully detach the connectors by following the manufacturer’s guidelines or using appropriate tools. Ensure you handle the cables and wires with care to avoid any accidental damage.
4. Remove any fasteners: If there are any fasteners or clips holding the cables or wires in place, gently remove them to separate the cables from the solar panels.
5. Label or document the connections: It’s a good practice to label or document the connections before removing them. This will make the reinstallation process smoother if you plan to reuse the solar panels in the future.
Always prioritize safety during this process and consider seeking guidance from a qualified professional if you are uncertain about any step.
Also read: Adding Solar Panels to Existing System: Maximizing Your Solar Energy System
Removing the Grounding System
When uninstalling a solar panel system, one crucial step is to safely remove the grounding system to ensure electrical safety. The grounding system is responsible for preventing electrical shocks and ensuring the stability of the system. Here’s a step-by-step guide on how to remove the grounding system:
1. Turn off the power: Before starting any work, make sure to shut off the circuit breaker connected to the solar panel system to cut off the power supply.
2. Locate the grounding components: Identify the grounding rod, usually a metal rod driven into the ground, and the grounding conductor, which connects the solar panels to the rod.
3. Disconnect the solar panel grounding conductor: Start by loosening the bolts or screws that hold the grounding conductor in place. Once loosened, remove the conductor from the grounding rod.
4. Remove the grounding conductor from the solar panels: Next, locate the point where the grounding conductor is connected to the solar panels. Unscrew or disconnect the cable from the panel’s metal frame.
5. Inspect and clean the grounding components: Examine the grounding rod and conductor for any damage or corrosion. If necessary, clean the components using a wire brush to ensure a good electrical connection.
6. Safely store the grounding components: After removing the grounding system, store the grounding conductor and rod in a safe place to prevent any damage or loss.
By following these steps, you can safely remove the grounding system associated with your solar panel installation. It is important to exercise caution and follow proper electrical safety protocols throughout the process to avoid any mishaps.
Also read: Solar Panel Snow Guards: Do You Really Need Them? Find Out Here
Settle the Components
When it comes to safely removing and uninstalling solar panels, it’s equally important to take care of the components once they have been detached from the system. Properly settling and storing the removed solar panels and related equipment will help ensure their longevity and protect them from any potential damage. Here are some essential guidelines to follow:
1. Secure Storage: Find a safe and dry location to store the solar panels. Ideally, they should be protected from moisture, extreme temperatures, and physical impact.
2. Protective Packaging: Wrap each solar panel individually in a soft material, such as blankets or bubble wrap, to prevent any scratches or other surface damage during transport or storage.
3. Secure Transportation: When moving the solar panels, make sure to secure them properly to avoid any shifting or sliding that could lead to breakage. Use straps or other secure attachment methods to keep them in place.
4. Maintain Orientation: Keep the solar panels in the same orientation they were installed, as flipping them could potentially impact their performance. Handle them carefully to avoid any twisting or bending.
5. Avoid Excessive Weight: Be mindful of the weight limitations when stacking or storing the solar panels. Excessive weight could cause structural damage or breakage.
6. Labeling and Documentation: Clearly label each panel and related components to ensure easy identification when reinstalling or transferring ownership. Additionally, keep any documentation or warranty information with the panels for future reference.
By settling the components of your solar panel system properly, you can ensure their safe storage and transport, preserving their functionality and protecting your investment.
Also read: Can Solar Panels Charge an Electric Car?
FAQs
Q: How difficult is it to remove solar panels?
Removing solar panels can be a technical task, but with the right knowledge and preparation, it can be done effectively. It is important to follow proper safety procedures and take necessary precautions to avoid any damage or accidents during the removal process. While it may require some physical effort and knowledge of electrical components, it is not overly difficult for individuals with basic DIY skills and understanding of solar panel systems.
Q: How much time is required to remove a whole solar panel system?
The time required to remove a complete solar panel system can vary based on several factors such as the size of the system and the complexity of the installation. On average, it may take a few hours to dismantle and remove the solar panels and associated components. However, it is recommended to allocate sufficient time for the removal process to ensure a safe and efficient procedure.
Q: Is water harmful to uninstalled solar panels?
While most solar panels are designed to withstand exposure to rain and other natural elements, uninstalled panels should be handled with caution in wet conditions. Excessive water exposure during the removal process or when stored improperly can potentially cause damage to the panels. It is advisable to cover and protect the panels during transportation and storage to prevent any water-related issues.


You May Also Like
Can Solar Panels Charge an Electric Car?
How Hot do Solar Panels Get
