How Long Does It Take To Install Solar Panels: A Comprehensive 2023 Guide
Are you considering installing solar panels but unsure about the timeline? We understand that the installation process can seem daunting, especially when it comes to determining how long it will take. But fear not, because we’re here to shed light on the solar panel installation timeline and help you make an informed decision.
Installing solar panels is a significant investment that can provide long-term benefits for your home or business. It’s crucial to have a clear understanding of the time frame involved to plan effectively and manage expectations. In this article, we will guide you through the entire installation process, discussing the factors that influence the timeline and providing insights into different types of solar panel systems.
Whether you’re considering a DIY installation or hiring a professional installation company, we’ll walk you step by step through the process. From obtaining the necessary permits to notifying your electricity supplier, we’ve got you covered. We’ll also explore the time required for commercial solar panel installations and discuss the materials used in manufacturing solar panels.
So, let’s dive into the solar panel installation timeline and ensure you have all the information you need to go solar with confidence.
Factors Influencing Solar Panel Installation Time
The installation timeline for solar panels can vary depending on several factors. Understanding these factors will help you better plan for your solar panel installation. Here are the key considerations that can influence the time it takes to install solar panels:
1. System Size: The size of the solar panel system plays a significant role in the installation time. Larger systems may require more components and wiring, leading to a longer installation process.
2. Roof Structure: The complexity and condition of your roof can affect installation time. A structurally sound and easily accessible roof will expedite the installation, while roofs with obstacles or in need of repairs may require additional time for preparation.
3. Local Regulations: Compliance with local regulations and permitting processes is crucial for solar panel installation. Different jurisdictions have varying requirements, and obtaining the necessary permits can add to the overall installation timeline.
4. Grid Connection: The process of connecting your solar panels to the electrical grid can also impact installation time. Ensuring compatibility and obtaining the required approvals from your utility company may require additional coordination and time.
It’s important to consult with a professional solar installer who can assess these factors specific to your situation and provide a more accurate estimate for your solar panel installation timeline.
Also read: The Complete Guide to Powering Your Home with Renewable Energy
Steps Involved in Solar Panel Installation
Installing solar panels involves several important steps that ensure a successful and efficient system. By following this step-by-step guide, you can have a clear understanding of what to expect during the installation process.
1. System Selection
Before installation, it is crucial to select the right solar panel system that suits your energy needs and budget. Consider factors such as the size of your roof, energy consumption, and the available sunlight in your area. Consulting with a solar installation company or an experienced professional can help you make an informed decision.
2. Site Preparation
Proper site preparation is essential to ensure the long-term performance of your solar panels. This includes inspecting your roof’s condition, evaluating its structural integrity, and identifying any potential shading issues. If necessary, roof repairs or reinforcements may be required to support the weight of the solar panels.
3. Design and Planning
Once the site is ready, the solar installation company will design a customized system based on your specific requirements. This includes determining the optimal panel layout, placement, and wiring configuration. They will also consider factors such as local regulations, building codes, and utility interconnection requirements.
4. Obtaining Permits and Permissions
Before starting the installation, it is crucial to obtain the necessary permits and permissions from the local authorities. This ensures compliance with regulations and allows for a smooth installation process. The solar installation company will typically handle this paperwork on your behalf, simplifying the process.
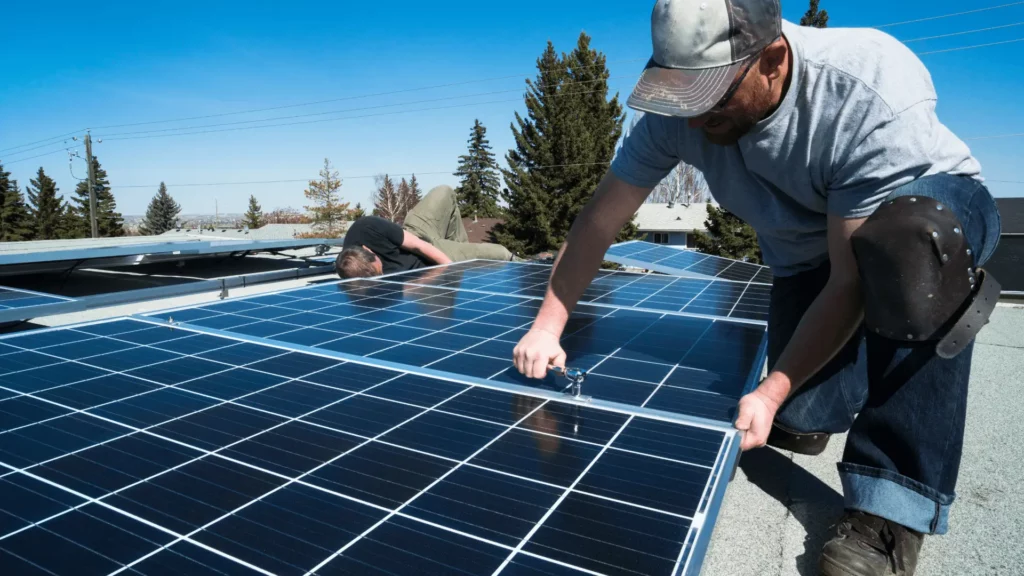
5. Installation and Wiring
With the permits in hand, the installation team will proceed with the actual solar panel installation. They will mount the panels on your roof or ground, secure them using appropriate hardware, and connect the wiring for optimal performance. The team will ensure that all electrical connections are properly made and tested for safety.
6. Testing and Commissioning
Once the panels are installed, the system will undergo comprehensive testing and commissioning. This includes verifying the electrical connections, testing the performance of individual panels, and ensuring that the entire system is functioning as expected. The installation team will also guide you on how to monitor and maintain your solar panel system.
By following these steps, you can ensure a smooth and successful solar panel installation process. It is essential to work with an experienced solar installation company to maximize the benefits of your investment in renewable energy.
Also read: How Renewable Energy is Transforming the Environment: 5 Major Benefits
Obtaining Permissions and Permits
Before embarking on your solar panel installation journey, it’s crucial to understand the importance of obtaining the necessary permissions and permits from local authorities. This ensures that the installation process is compliant with local regulations and that your solar panels are installed safely and legally. Here’s a step-by-step guide to help you navigate this important aspect of solar panel installation:
Research Local Regulations and Requirements
Each region or municipality may have specific rules and regulations regarding solar panel installations. Take the time to familiarize yourself with these requirements to ensure that you meet all the criteria and obtain the necessary permits. This may include understanding setback requirements, height restrictions, and any zoning or building code regulations.
Contact Local Authorities
Reach out to your local building department or planning commission to inquire about the specific permits and permissions needed for solar panel installation. They will provide you with the necessary application forms and guide you through the process. Some common permits you may need include a building permit, an electrical permit, or a solar panel-specific permit.
Engage with Homeowner’s Association (if applicable)
If you live in a neighborhood or community governed by a homeowner’s association (HOA), it’s essential to communicate with them about your solar panel installation plans. They may have specific guidelines or aesthetic requirements that you need to adhere to. Obtain written approval from the HOA before proceeding with the installation.
Submit Permit Applications
Once you have gathered all the required documents and forms, submit your permit applications to the relevant authorities. Be sure to include all necessary supporting materials, such as your system design, structural engineering reports, and electrical plans.
Follow Up and Pay Fees
Track the progress of your permit applications and promptly respond to any requests for additional information. Once your applications are approved, you will be notified of any fees that need to be paid. Ensure that you settle these fees promptly to avoid any delays in the installation process.
By obtaining the necessary permissions and permits, you can ensure a smooth and compliant solar panel installation. Compliance not only guarantees the safety and efficiency of your system but also protects you from potential legal issues. Take the time to understand the specific requirements in your area and work closely with local authorities to navigate the permitting process effectively. Now that you’re familiar with the importance of permissions and permits, let’s move on to exploring the different installation times for various types of solar panel systems.
Also read: Why You Should Consider Solar Energy for Your Home | Advantages of Solar Energy
Solar Panel Installation Times: Roof vs Ground vs RV
When it comes to installing solar panels, the time required can vary depending on the type of system you choose. Let’s compare the installation times for roof-mounted, ground-mounted, and RV solar panels to give you a better understanding of what to expect.
Roof-Mounted Solar Panels
Roof-mounted solar panels are the most common installation option for residential properties. The installation process typically involves the following steps:
1. Site Assessment: A professional installer will assess your roof’s suitability for solar panels, taking into consideration factors like orientation, shading, and structural integrity.
2. Design and Planning: The installer will design a customized solar system for your specific roof and energy needs. This includes determining the optimal panel layout and calculating the number of panels required.
3. Permitting and Inspections: Before installation can begin, necessary permits and approvals from local authorities must be obtained. This process can vary in length depending on your location.
4. Installation: Once permits are secured, the actual installation process begins, which involves mounting the panels onto your roof, connecting them to the electrical system, and installing an inverter to convert solar energy into usable electricity.
On average, roof-mounted solar panel installations can take anywhere from a few days to a couple of weeks, depending on the complexity of the project and the availability of the installer.
Ground-Mounted Solar Panels
If you have ample space available on your property, you may opt for ground-mounted solar panels instead. The installation process for ground-mounted systems includes:
1. Site Assessment: Similar to roof-mounted systems, a site assessment is conducted to determine the best location for the panels, taking into account factors like sun exposure, shading, and terrain.
2. Design and Planning: A customized solar system is designed to fit the available space and meet your energy requirements.
3. Permitting and Inspections: As with any solar installation, obtaining the necessary permits and inspections is essential.
4. Foundation and Mount Installation: Ground-mounted solar panels require a secure foundation and mounting structure to withstand various weather conditions. This step may take some time, depending on the complexity of the terrain.
5. Panel Installation and Wiring: Once the foundation is ready, the panels are installed, connected to the electrical system, and wired accordingly.
Overall, ground-mounted solar panel installations tend to take longer than roof-mounted ones due to the additional steps involved. It can take anywhere from a few weeks to a few months, depending on the specific project requirements.
RV Solar Panels
For those who want to harness solar power while on the move, RV solar panels offer a convenient and eco-friendly solution. The installation process for RV solar panels is relatively straightforward:
1. Panel Selection: Choose the appropriate solar panels for your RV based on your energy needs and available roof space.
2. Mounting: Install mounting brackets or racks on your RV’s roof to securely hold the panels in place.
3. Wiring and Connection: Connect the panels to a charge controller and then to the RV’s battery system. This will ensure that the solar power generated by the panels can be stored and used when needed.
RV solar panel installations are generally quicker compared to roof-mounted and ground-mounted systems. The process can typically be completed within a few hours to a couple of days, depending on the complexity of the system.
It’s important to note that these installation times are general estimates and can vary based on various factors such as the size of the system, the complexity of the installation, and the availability of professional installers in your area. To get a more accurate timeline for your specific project, it’s recommended to consult with a reputable solar installation company.
Remember, investing in solar panels is not just about the installation time but also the long-term benefits of clean energy and potential cost savings.
Also read: Top Renewable Energy Sources for a Better Future
DIY Solar Panel Installation: Pros and Cons
When it comes to installing solar panels, some homeowners consider the option of doing it themselves rather than hiring a professional contractor. While DIY solar panel installation has its advantages, it also comes with certain challenges to consider. Let’s explore the pros and cons of taking on this project yourself.
Pros of DIY Solar Panel Installation
1. Cost Savings: One of the primary reasons homeowners opt for DIY installation is the potential cost savings. By eliminating labor costs, you can significantly reduce the overall expenses associated with solar panel installation.
2. Learning Opportunity: Installing solar panels yourself provides a valuable learning experience. It allows you to gain knowledge about the system’s components, electrical wiring, and overall functionality. This newfound knowledge can empower you to maintain and troubleshoot your system in the future.
3. Flexibility in Design: DIY installation offers flexibility when it comes to customizing the design of your solar panel system. You have control over the placement and orientation of the panels, ensuring optimal energy production based on your specific needs and location.
Cons of DIY Solar Panel Installation
1. Technical Expertise: Installing solar panels requires a certain level of technical expertise. It involves electrical work and proper knowledge of safety measures. If you lack experience or confidence in these areas, DIY installation may not be the best option.
2. Time and Effort: DIY installation can be time-consuming and labor-intensive, especially for those without prior experience. The process involves various steps such as system sizing, wiring connections, and mounting the panels, all of which require careful attention to detail.
3. Potential Mistakes: Without professional guidance, there is an increased chance of making costly mistakes during the installation process. These mistakes can compromise the effectiveness and efficiency of your solar panel system.
It’s important to weigh the pros and cons before deciding on DIY solar panel installation. Consider your level of expertise, available time, and willingness to invest in acquiring the necessary knowledge and skills. If you’re uncertain, it’s advisable to consult with a reputable professional solar panel contractor who can ensure a seamless and efficient installation process.
Remember, the successful installation of solar panels is crucial for maximizing energy production and achieving long-term savings.
Also read: Upgrade Your Home’s Energy Efficiency with These 12 Easy Steps
Notifying Electricity Supplier About Solar Panels
When installing solar panels, it is important to inform your electricity supplier about the upcoming installation. This helps ensure a smooth transition and allows the supplier to make necessary adjustments to your electricity account. Here are some guidelines on how and when to notify your electricity supplier:
1. Contact your electricity supplier: Reach out to your electricity supplier well in advance of the installation. Provide them with details such as the date of installation and the estimated completion time. This will allow them to update their records accordingly.
2. Provide relevant documentation: In some cases, your electricity supplier may require specific documents related to the solar panel installation. This could include details about the system size, the installer, and any necessary permits obtained. Be prepared to provide these documents if requested.
3. Check for interconnection requirements: In certain regions, there may be interconnection requirements that need to be met before the solar panels can be connected to the grid. Your electricity supplier will have information on these requirements, so it’s essential to discuss this with them beforehand.
4. Inform about any changes in energy production: After the solar panels are installed, keep your electricity supplier informed about any changes in energy production. This includes any increase or decrease in electricity generated by your solar system. This will help them adjust your billing accordingly.
Remember, each electricity supplier may have specific guidelines and procedures that need to be followed. It’s important to reach out to them directly to ensure compliance with their policies.
By notifying your electricity supplier about your solar panel installation, you can ensure a seamless integration of solar energy into your electricity system. This will ultimately help you maximize the benefits of your solar investment.
Installation Time for Commercial Solar Panels
When it comes to commercial-scale solar panel installations, the time required for the installation process can vary depending on several factors. Here, we will discuss these factors and provide a general timeline to give you a better understanding of what to expect.
Factors Influencing Installation Time
1. System Size: The size and complexity of the commercial solar panel system play a significant role in determining the installation time. Larger systems with more panels may require more time for proper mounting and wiring.
2. Roof Structure: The condition and structure of the roof also impact installation time. If the roof needs repairs or reinforcement to accommodate the solar panels, it may take additional time to complete the installation.
3. Local Regulations: Different areas have specific regulations and codes that govern the installation of commercial solar panels. Complying with these regulations and obtaining the necessary permits can add time to the overall installation process.
General Timeline for Installation
While each installation is unique, a typical commercial solar panel installation can range from a few weeks to several months. This includes time for site assessment, system design and engineering, obtaining permits, and scheduling the installation.
It is important to note that some external factors, such as weather conditions or availability of solar panel components, can also influence installation time. Therefore, it is advisable to consult with a professional solar installation company that can provide a more accurate timeline based on your specific project.
Remember, investing in commercial solar panels can bring long-term benefits such as reduced energy costs and environmental sustainability. By understanding the installation process and timeline, you can better plan and prepare for a seamless transition to clean, renewable energy.
Also read: Increased Energy Efficiency Ultimately Leads to Lower Costs
Solar Panel Manufacturing: Materials and Process
Solar panels are made up of several key materials that work together to harness the sun’s energy and convert it into usable electricity. Understanding the materials used in solar panel manufacturing is crucial to comprehending the overall process. Here’s an overview of the materials involved and the steps in the manufacturing process:
Materials Used in Solar Panel Manufacturing
1. Silicon Wafers: The core component of solar cells is the silicon wafer. It is typically made from crystalline silicon, which is sliced into thin wafers. Monocrystalline wafers offer higher efficiency, while polycrystalline wafers are more cost-effective.
2. Encapsulant: A layer of encapsulant material, such as ethylene-vinyl acetate (EVA), is used to seal the silicon wafers and protect them from external elements. It ensures durability and enhances the panel’s performance.
3. Backsheet: The backsheet acts as a protective layer on the rear side of the solar panel, shielding it from moisture and other environmental factors. It is typically made of a polymer-based material like Tedlar or TPT (Tedlar-PET-Tedlar) for durability.
4. Solar Cells: These are the individual units that generate electricity when exposed to sunlight. Solar cells are made of doped layers of silicon and metal conductors, facilitating the movement of electrons and creating an electric current.
5. Frame: The frame provides structural support and protection to the solar panel. It is usually made of aluminum or stainless steel, ensuring the panel’s stability and longevity.
Solar Panel Manufacturing Process
1. Silicon Ingot Production: The manufacturing process begins with the production of silicon ingots, which involves melting the raw silicon and solidifying it into large blocks or ingots.
2. Wafer Slicing: The silicon ingots are then sliced into thin, circular wafers using a diamond-wire saw or a multi-wire saw. These wafers are carefully handled to avoid any damage or contamination.
3. Cell Fabrication: The silicon wafers undergo a series of chemical treatments and thermal processes to create the necessary layers and structures for the solar cells. This includes the deposition of anti-reflective coatings, application of metal contacts, and forming the PN junction.
4. Module Assembly: Once the solar cells are fabricated, they are assembled into modules. This involves interconnecting the cells using busbars and soldering them to a backsheet. An encapsulant is then applied, and a front sheet is added to protect the cells.
5. Testing and Packaging: The assembled solar panels undergo rigorous testing to ensure their performance and reliability. This includes electrical testing, thermal cycling, and visual inspection. Finally, the panels are packaged and prepared for distribution and installation.
By understanding the materials used and the manufacturing process behind solar panels, it becomes easier to appreciate their efficiency and eco-friendly nature. As advancements continue in the solar industry, innovations in materials and manufacturing techniques are constantly evolving, leading to more efficient and cost-effective solar panels.
Also read: Solar Panels for Tiny House Living: Everything You Need to Know
Winding Up
Installing solar panels can be a wise investment for both homeowners and business owners alike. Understanding the timeline and factors involved in solar panel installation is crucial for making an informed decision.
Throughout this guide, we have covered various aspects related to solar panel installation. Here are the key takeaways:
1. Factors Influencing Installation Time: The time required for solar panel installation can vary depending on factors such as the size of the system, roof structure, and local regulations. It is important to consider these factors when planning your installation.
2. Steps Involved in Installation: Installing solar panels involves a step-by-step process, including system selection, site preparation, design, and planning. By following these steps, you can ensure a smooth and efficient installation.
3. Permissions and Permits: Before installing solar panels, it is crucial to obtain the necessary permissions and permits from local authorities. This ensures compliance with regulations and avoids any legal issues.
4. Different Installation Times: The installation time may vary depending on the type of solar panel system. Whether it is roof-mounted, ground-mounted, or RV solar panels, understanding the differences in installation times can help you choose the right system for your needs.
5. DIY vs Professional Installation: While some individuals may consider DIY solar panel installation, it is important to weigh the pros and cons. Hiring a professional contractor can ensure proper installation and safety.
6. Notifying Electricity Supplier: Consider notifying your electricity supplier about the installation of solar panels. Guidelines may vary, so it is essential to research and determine the requirements in your area.
7. Commercial Solar Panels: Commercial-scale solar panel installation may have additional considerations and factors influencing the installation timeline. Consulting with a professional can help determine the specific requirements for your business.
8. Solar Panel Manufacturing: Understanding the materials used in solar panel manufacturing and the manufacturing process can provide insights into the quality and efficiency of the panels you choose.
Installing solar panels offers numerous benefits, including reducing energy costs, minimizing environmental impact, and increasing property value. By following the guidelines and considering the factors discussed in this guide, you can make a well-informed decision about solar panel installation and enjoy the advantages they offer.
Remember, proper planning, research, and consultation with professionals are key to a successful solar panel installation. Invest in renewable energy and contribute to a sustainable future.


You May Also Like
What Does Geothermal and Solar Energy Have in Common?
How Hot do Solar Panels Get